
quick and easy spun cotton strawberry sewing pins

These sweet little strawberry pins are definitely the easiest and fastest spun cotton make I’ve shared so far - and because of those things, and because they’re so cute and practical - I also think they’re the most gift-able spun cotton project I’ve yet made.
Spun cotton strawberries have been done and done again and I’d guess they’re probably as old as the craft itself - so maybe it seems silly for me to share this third tutorial about spun cotton strawberries (strawberry ornaments were actually the first spun cotton project I shared on YouTube as a make-along several years ago) —- but strawberries never go out of style, right? They seem to have timeless appeal.
Today I’m putting a little twist on a classic.
I’m really excited about this idea - strawberry sewing pins are the perfect project for beginning with spun cotton - you can have a whole batch of pins in an hour or two, and because you don’t have a ton of time invested, and because they’re so simple to make, they’ll turn out cute no matter what - I’m almost certain you’ll want to share some of your crop of cotton berries with your favorite people…
This is also a great project for older kids who are able to be careful with the pins - my nine-year-old daughter Nettie joined me in making them in the YouTube make-along and hers turned out great!

They look so sweet nestled in a pin cushion. And I think they’ll make wonderful gifts for almost anyone who sews or crafts - I’m hoping to sew some strawberry pin cushions and needle minders to go with them as gifts - or you could give a little cluster of them in a vintage pin cushion you find at a thrift store - or just tuck several into a pretty scrap of old fabric and tie it up with lace. I honestly can’t think of many people who wouldn’t enjoy some tiny strawberry pins :) and the fact that they’ll be homemade makes them extra special.
To make these strawberry sewing pins, you’ll need:
cotton balls or other cotton fiber
straight pins - the longer the better but preferably 1.5” or longer
school glue like Elmer’s and water (mix your glue and water at 1 part to 3 or 4 parts ratio, so one tablespoon of glue would be mixed with 3 to 4 tablespoons of water)
paint and paintbrushes (I’m using acrylic craft paints today but you can also use watercolor or gouache or a combination of them)
aluminum foil (a good opportunity to recycle clean foil if you save it - i have boxes of chocolate wrappers I keep)
fabric or paper for the tops
wire (for stems, optional)
darning needle (for making a hole for the wire stems)
hot glue or craft glue (optional, not strictly necessary)
scissors
sealant like Aleene’s or Mod Podge (optional)


One thing I learned as I was making these is that there are multiple lengths of sewing pins out there - it seems like the most common sizes are 1.5 and 1.75 inches - use whatever you have that’s the longest!

begin by using a little hot glue to secure the pin head to the foil
Take your straight pin and a very small piece of foil (I always use the foil wrappers from the dark chocolate I eat but you can use any clean (as in nothing that would spoil), dry aluminum foil - place a small amount of hot glue on the edge of the foil and then lay the pin head into the hot glue and close the foil around the pin head, forming it into the shape of a small strawberry. Mine are quite small - they will grow when you add cotton so keep that in mind.
NOTE: Keep the foil shape as near the top of the pin as you can, to preserve as much of the pin length as possible. If you build your strawberry shape down around the pin length, you’ll be left with a very short, stubby pin that can be displayed in a pin cushion, but might not be long enough to use in fabric or pin into a needle book.


brush a little of the glue mix onto the foil shape
Now it’s time to add the cotton fiber - you can use cotton balls like you buy at the drug store, which is what I’ve used today - or you can use cotton quilt batting or the nicer spinning fibers if you have them, like cotton punis or sliver which you can find at The Woolery or Cotton Clouds or you can find those fibers in a starter kit in my shop.

Brush some of your glue mixture onto the foil shape and then take a small amount of your cotton fiber and wrap it tightly around the foil, using your brush to push the fibers down into shape. You only need as much cotton as it takes to cover the foil and achieve the shape you like - probably just a pinch or two from a cotton ball.

This is the size my berries end up - a little less than half an inch across.
Now you’ll probably want to make at least a few more while you’re at it so you can do all the painting and details in one go.

Once you have a handful or a saucer-full of strawberries it’s time to start painting - I think it’s easiest to paint them while the cotton is still wet or damp - the cotton absorbs the paint better this way. But you can try it both ways and see how you prefer it.
I’m using acrylic craft paint today, Folkart and Decoart Americana brands and I have a primary red and lipstick red color. The white is folk art “parchment” and the green I chose is “light avocado” by Americana.

I like to paint while the cotton fibers are wet but experiment and see what you like :)
Paint how you like - you can add white to the top or tip, or splotches of yellow or darker red, or if you want a primitive look you can age with some tea or coffee. You could do some green strawberries if you like that idea! (I wish I had thought of that before this moment haha)


I dry the berries before I paint on the white seeds so they don’t bleed. You can air dry for several hours or overnight or dry in your oven or toaster oven. I set the toaster oven on 250 for 5 or ten minutes for something this small. Or you can heat the oven up to 300 and turn it off and set the berries in for 30 minutes or so. Setting things over a heating vent or radiator speeds things up too.
NOTE: If you have trouble with spun cotton pieces sticking to the plate as you dry in the oven, a very good suggestion from a follower was to cut a raw potato in half and place the cut side down on your plate, then with these strawberry pins, stick the pin into the potato to dry in the oven. You can use that technique for other spun cotton pieces if you think of it beforehand and build your piece around a dowel or toothpick.. I also find that if your piece is dead-wet, that’s when the worst sticking happens. So try not to use more glue and water mix than is necessary and if your piece is so wet that you can squeeze water out of it if you pinch, you might let it air dry for a bit before using heat. Or add a bit more cotton on top to sop up some of that extra moisture.

While the berries are drying, prepare your tops (if you’re painting fabric or paper). I painted my fabric pieces with the green acrylic paint and then added a dab of coffee and a bit of yellow ochre watercolor.
If you’re using a printed fabric or paper that doesn’t need painted, you can make the tops any time.
I like to cut out the shapes I want, paint, and then dry with the berries. The fabric dries very quickly. You can use pinking shears and cut out a small circle or you can cut the sawtooth pattern yourself in an oval or circle.. or you can cut out strips of sawtooth leaves to wrap around the stem. I cut out individual leaves too. They all looked fine to me and I don’t recommend one over another.

the fabric leaf tops can be painted and then dried with the berries
The seeds can be made lots of ways - you can use a fine brush for tiny seeds or a larger one for larger 'dots’ - a toothpick might also work in a pinch. Or I think white gel pens would work or white sharpies. You can make your seeds other colors besides white too - some people used black pens or sharpies several years ago when we were making strawberry ornaments and they looked great! So feel free to use what you have and experiment.

The seeds are usually dry enough to handle after a few minutes so if you’re adding wire stems to your berries, use a darning needle to punch a hole in the top.

Then insert a small length of wire with hot glue, super glue, or craft or school glue. Add a bit more glue around the wire to attach your fabric or paper leaves. I like to make my tops a bit large or long so that I can “scrunch” the fabric around the stem but you might like the look of a flat top or one that is glued down smoothly.

At this point you can decide if you want to use a sealant - I demonstrated using a matte finish Mod Podge in the YouTube make-along and that seems to work fine. I also use an Aleene’s matte finish spray sealant for other projects and have good results with that. Sealant is not necessary if you don’t have it but for these, since I thought they might get more handling and “use” than some other things I make, I thought it was a nice precaution to preserve the paint or potentially the fabric they are used on.

And that’s all there is to it! Now you’ll want to make a few dozen more for all your favorite creative friends :)
Thanks so much for reading this and for your support and I wish you happy making!
xoxo
Rosanna

The home place
Vestiges
The gravel drive has mostly returned to a grass track -
perhaps not so different from the way it was in 1908
when Frank Bstandig was signing his name to the back
of a pine stair riser that may or may not have been
new timber at the time - maybe it was saved and set aside
from some other house, kicked and scuffed by other feet
before it was fitted in as the eighth step of fourteen
to the four upstairs bedrooms, will be gouged and chipped
by the ups and downs of three generations of Snyder children
before it comes to rest under my art room workbench.

The lilacs that Leonard planted for Wilma the spring before
he stepped out of the tractor and lay down in the grass
and never got up, have grown up to those bedroom windows,
mostly dead wood now with elm and hackberry grown in—
but something is blooming, something is sweet on the May breeze—
not the haggard snowball bush, full of dark, naked limbs -
or the two remaining alliums with audacious purple globes -
not the single yellow iris nearly choked out by brome grass -
it’s the old mock orange at the bottom of the east yard,
full of blooms and bees and looking just the same,
just the same as when Grandma sat rocking, rocking in her chair
looking out towards the sunrise, over the horizon,
through the wavy glass of the double windows
that have been removed, the weights cut out and left to lie
with the bits of lumber and scrap that no one can see
any good use for now, though surely old Frank
would have wedged them in a nest of straw under his wagon seat -
might even have taken this house apart board by board
back in 1908, but no one anymore has the time or patience,
and the window weights and the studs and floor joists,
plaster and lath will all be razed and buried
in the span of a few hours - and all that will remain
to mark the one hundred and sixteen years this house stood
on the home place will be some ancient fruit trees,
a faint grass track, and for a few warm days in May,
the glinting scent of mock orange blossoms on the wind.
May 2024


There have been many goodbyes over the years and I know this isn’t the last, last goodbye to the home place because even when the house is buried and the site smoothed out and grass has overtaken the sepia colored soil, this piece of land will throw up the spirit of the crooked yellow house and of Grandma standing at the door, squinting in the sun to see which of her family was coming down the drive. I know that image will be here anytime I return, but I also know I carry it in my mind’s eye because iterations of this dear place have been coming off my pen and paintbrush for weeks.

I didn’t plan to drive down to Grandma’s house last Friday, it just happened... I think perhaps I was called back, as early in the week I smelled something sweet and familiar on the breeze on my way to the mailbox and realized that the one remaining Russian olive tree in the fencerow down the road must be blooming. If I’m lucky, I catch it in bloom for one or two days each year. There used to be half a dozen in a row but the county pushed out all but part of one several years ago and it has gone on living and blooming despite being completely toppled by the backhoe they use to “clean up” the road sides. Russian olive is considered an invasive species in Nebraska, and despite that fact, I find the silver-leaved tree so beautiful and exotic looking that I’ve been tempted many times to try planting it in my yard.

I visited the tree for a few moments, standing still while bees of all sizes bobbed around me in the sticky yellow blossoms. I tried to think of how to describe the scent and decided that maybe it was a mixture of lilac and honey but I think I was probably influenced by the bees.. there is something heavenly about it on the breeze though, while up close it is almost cloying.
The same sort of ambrosial scent was in the air as I climbed over the fence and walked down the drive to Grandma’s house a few days later and I thought maybe there was a Russian olive growing in the gulley though it would have been hard to see. Instead of going straight inside I slowly wandered around the outside of the house, hunting for old plants and taking photos.

Seven years is plenty of time for nature to begin to reclaim what was hers and most things in the yard and garden that Grandma worked so hard to grow and cultivate have disappeared or are dead and dying.. .. it’s humbling to see how quickly fifty years of effort is undone. A number of the larger trees have survived including the linden tree Grandma planted for me the year I was born and enterprising young elm and locust trees that seeded themselves near the foundation over the years, left alone at last after seasons and seasons of being pruned and hacked back, have shot up to the roof in a speed and manner that plants only seem to possess when they know they’re unwanted.
If you had the interest or patience to read the poem above, you’ll know that the perfume in the air was from the mock orange bush in the east yard and it did smell remarkably like the Russian olive until I got up close and again, stood with the bees, dipping my nose into flowers which did not smell of honey, but a cross between wild roses and apple and citrus blossoms. The bush was taller and more spreading than I remembered but didn’t seem any the worse for being left to her own devices for seven years - she looked healthy and vigorous and completely at home in this yard which had grown so wild.


Inside, there’s very little left that made this Grandma’s house, or our family’s “home place,” and I needed to see it this way and to know that we had taken out and saved much of what we loved about the house - and that what will be buried in a few weeks time, are only the bones and facade.. of course the rooms still hold memories but I found myself drawn to the windows, to the views and scenes outside the house, to the blue-painted kitchen windows where Grandma stood washing dishes each morning, afternoon, and evening - to the front room windows where she rocked and watched the sun rise and the birds come to her feeders, the bathroom window where I found one last inspirational passage taped to the frame.
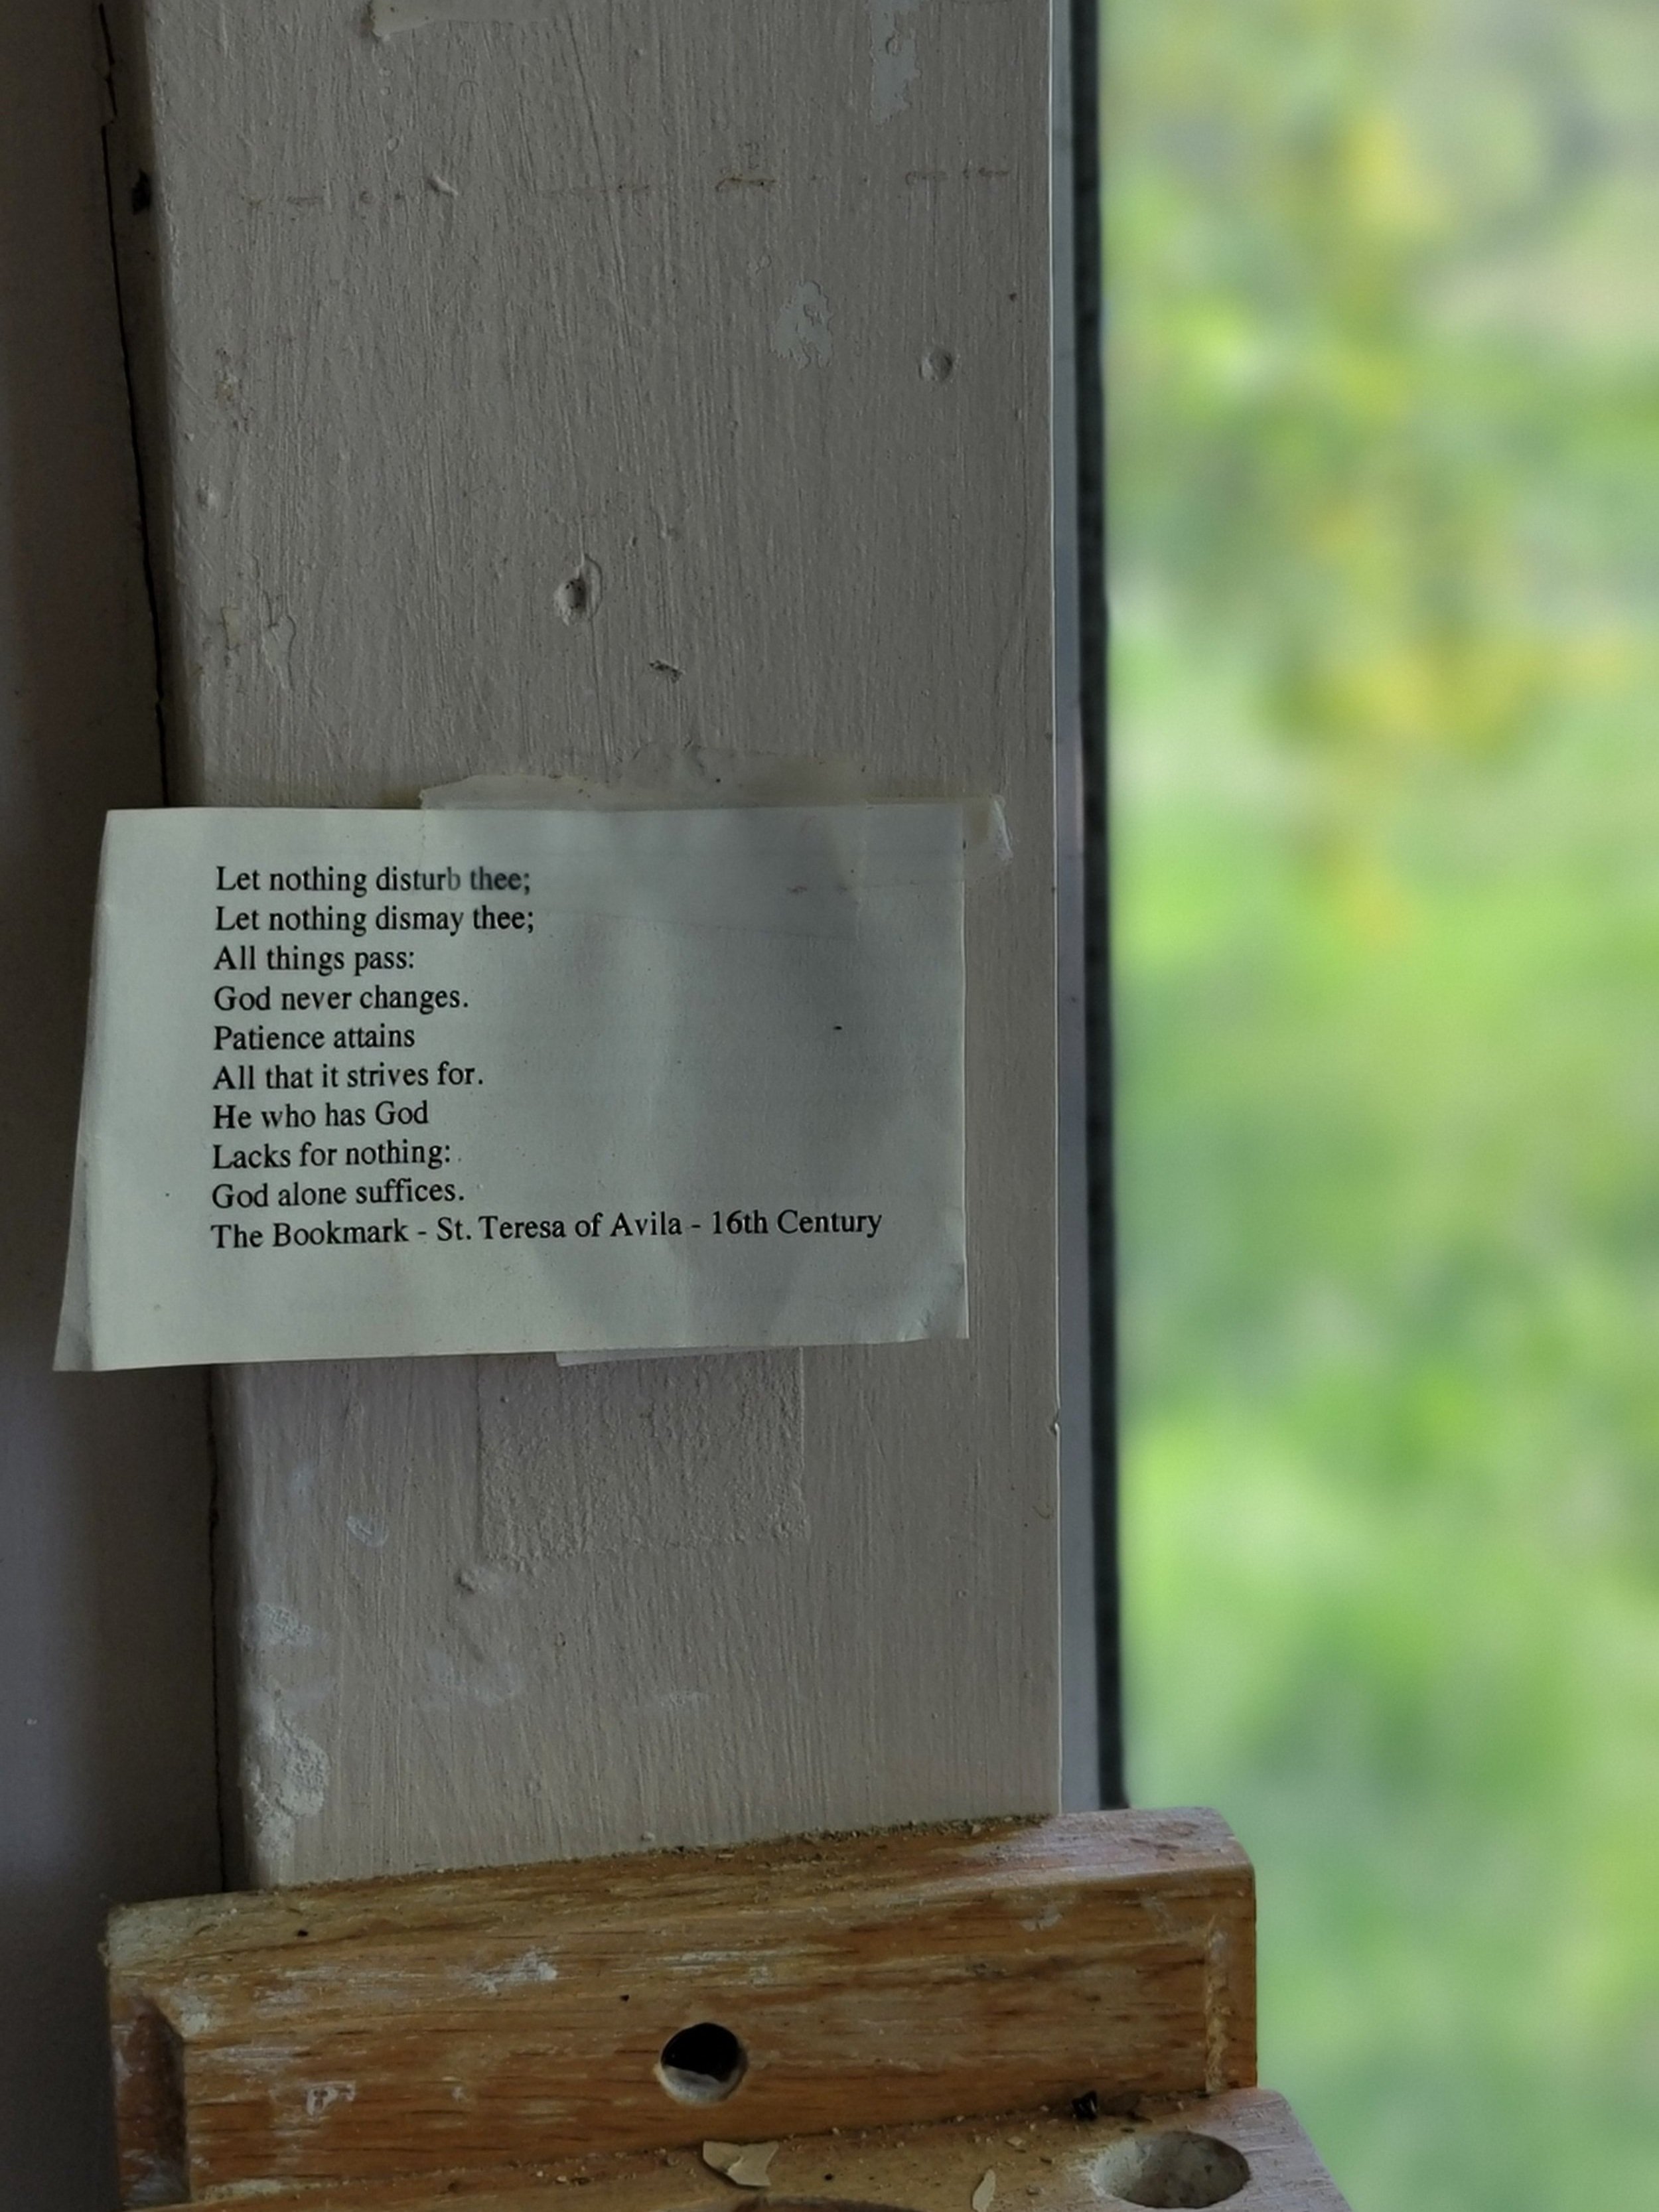
I think this passage was a last gift that Grandma left us - I know it felt and feels like an offering to me and to my mom when I shared it with her - even after we had removed so many from other parts of the house, had found so many tucked in books and her bible.. this one is the last the house held and it went straight to my heart... it’s taped to the beautiful fluted window casing we saved from her piano room in my art room and below my worktable lies the legendary (to our family) piece of lumber signed by Frank J Bstandig in 1908 when he finished building the house that Grandma would make our family home for more than fifty years.

Let nothing disturb thee,
Let nothing dismay thee,
All things pass...
(St. Teresa d’Avila)

Featured Posts


