Dwell in Possibility (let’s make a cabinet cottage for a mouse)
I’m a little compulsive about keeping boxes.. . there are just so many possibilities in almost any box - I started listing some of my favorites and quickly exhausted myself so I’ll spare you my very inclusive (perhaps all-encompassing) list of boxes that are worth keeping, because as it turns out, to me, they almost invariably are (worth keeping, that is :)) I was going to tell you how many I estimate are stacked up on shelves in the basement, and smaller ones squirreled away in old baskets and closets all around the house… but when I typed the number a moment ago I felt distinctly self-conscious, because it seems like very big number, a number that doesn’t make sense if I compare it to how many I actually manage to re-purpose in a year. But then again, when I went to look for a box for this mouse house project, I only managed to find two that I thought would work, and really only one that seemed “just right.”
I might be a little too particular about boxes. I might also be a hoarder. Sigh. I’m working on it.
You don’t need a collection, hoard, or fortune of boxes for this project, though - I do think the size of box I chose is a common one, and actually I think the reason I only had a couple in that Goldilocks size is that they are so common that I don’t always think to keep them - so many things come in an 8 by 11 inch box that I don’t feel apprehensive about tossing them right into the recycle pile. I’ll be keeping a few on hand from now on.
(I prefer a shipping box made of corrugated cardboard for this project because it’s sturdier and won’t bend and warp as much as a thinner box, like a shoe box. Shoe boxes will be about the right size, but you might need to reinforce the sides with pieces of corrugated cardboard so they don’t bow. )

You can watch the video tutorial for this cabinet cottage for a mouse here.
You can make your mouse house - or “cabinet cottage” - any size you want - and you can make it as simple or as ornate as you have time and patience for. It took me a few false starts before I ended up at this size, which is much larger than I originally pictured for our mouse bedroom - but after really thinking about what I wanted to put in the bedroom, and how much space those things would occupy, this seemed like a more practical and realistic scale to work in.
So find your box. Mine is, as I said, is 8.5 inches by 11, and 5.5 inches deep.
Now cut the flaps or tabs off the open end.
If you have a larger box, like mine, you can decide if you want to add a shelf for an upstairs/downstairs. I folded a piece of corrugated cardboard in half and left a half inch “face” in the middle to give the shelf more dimension and visual weight. Use some masking tape to secure the shelf in a few places.

Then I added some thin strips of corrugated cardboard around the front edge of the box to make a frame. This gives the box a nicer look and makes it look more substantial, like an actual piece of furniture. I was trying to replicate an antique folk cabinet I found in an image search.

It was a bit of a stretch goal to replicate this, haha, but I like to start with something I really love. And this cabinet really captured my imagination. The little windows are so whimsical.
Secure your frame to the box face with tape and then you can decide if you want to add the “decorative ledge” at the top. All these steps are shown in the YouTube tutorial so I won’t go into the construction in great detail here - I mainly wanted to share a few still photos of the painting, as well as some links to tutorials for folk flower painting, to supplement the video tutorial.
If you decide to build a door, simply cut a piece of cardboard to roughly fit your opening, inside the face frame. I recommend leaving 1/8 inch gap on each side of your door to allow for the paper mache - in other words, make your door about 1/4 inch smaller in length and width than your opening.
If you’re going to cut openings for windows or add any decorative elements to the door, like I did, you want to do that construction before you attach the door.
You can use my very basic, very sketchy templates if you like - they will have to be modified if you use a box in a different size than mine - but they are quite simple and when you see them, you might feel more confident to make your own designs :) The link above will take you to a printable pdf - or you can try tracing from the image below - or when you see them, you will realize that you can do something better on your own!


I like to make “fabric hinges” for paper mache pieces. I’ve tried several methods, including paper and tape hinges, and also just leaving the cardboard attached and bending it - but I like the flexibility of fabric - it makes a more mobile door and is quite strong.
To attach the door, I first used some hot glue to attach two fabric strips to the door. Then I used more glue and placed a strip of cardboard over the fabric to give it more secure adhesion to the door. Then I did basically the same thing with the other side of the fabric strips to the inside of the box, attaching with hot glue just inside the edge of the box, and then placing another strip of cardboard and glue over that fabric. Again, this is shown in the video :)

Now you just cover everything with paper - any kind of paper you have - though a thinner paper like dictionary pages is ideal for the front of the door if you gave it dimensional details like I did. It won’t flatten out the definition. If you made a more plain door or cabinet, then really any kind of paper will work - and things like brown paper from packaging or grocery bags is particularly strong and will give the structure more strength if you think it needs it.
I really love my cooked flour paste, which is just half a cup all purpose flour mixed with a few cups of water and then cooked just until it starts to thicken and bubble. It’s not an exact science and you can do flour and water without cooking too - I just prefer it this way. There are other options that add glue to the flour mix or use just glue and water, or you can use other types of starch or flours… I’m going to leave that up to you.
I used some tissue paper to go over very fine details and not lose definition.
One note - if you have made a door and done fabric hinges, I recommend NOT covering over the hinge area (outside or inside) - the paper will just get crushed and crinkled and the hinge works better if it’s left uncovered. So just try to use a straight edge of paper on the edge of your door, right up to the edge of the door.

Of course let things dry and maybe check your piece periodically as it dries to see if any parts of the box or cardboard is warping or bending in a direction you don’t want. This can be remedied to some extent by pushing it back into shape, or using objects to apply pressure or weight.
Now you can start painting - I wanted my cabinet cottage to look aged so I did an undercoat of two brown acrylic paints - a lighter brown and a dark umber brown. I did one coat on the outside and the inside of the door - it didn’t quite cover the paper in all places but it was close enough for my purposes. Let dry an hour or so and then if you want to attempt the crackle coat finish, you can apply a coat of school glue (pva glue) over all your brown paint or whatever your undercoat color is. You should do a fairly thick coat, thick enough that it doesn’t start to dry immediately - but not so thick that it’s opaque and white. Let that dry 5 or ten minutes, but don’t let it dry completely - you don’t want the glue to be cured or it won’t make the crackle. (you might do an experiment with the glue on the back so that you have an idea of how thick the glue needs to be)
Now apply your top coat - I did a mix of a pale robin’s egg or duck’s egg blue and a sage green acrylic paints. I didn’t mix it thoroughly because I like variations in color. The crackle will appear as the paint dries, not instantly. I get the most crackle in areas where the glue was thicker and not quite dry when I applied the topcoat.
When your box is dry, you can also use a fine grit sanding paper or sanding sponge to carefully remove more of the top layer of paint.

Now is the really fun part, or I think so - decorating your cabinet door (or the sides of your box if you didn’t make a door) … I’m not experienced at all with folk painting or folk designs and patterns but I do love them. So don’t look to what I did as your guide unless you like it - I always intend to practice painting folk flowers and patterns but never seem to follow through - but I’ve been looking for some resources for you, in case you’d like to try some simple designs on your box or cabinet, and I really feel inspired to be intentional about developing this skill.
I used a mix of watercolor and gouache paints for my decorative elements for a couple of reasons - one is that I wanted to be able to wipe it off if I really hated anything I painted - and the other is that I wanted the designs to look soft and faded and aged like the background we created, and this way I can control the thickness and brightness of the paints. You can definitely achieve that look with acrylic, you will just need to water down your paints.
I will of course have to find a way to seal at least the front door of the cabinet because of this choice, so bear that in mind. I will most likely use Alene’s matte finish sealant spray or a water-based polyurethane product.
I’ve put some close-up photos here for you to see more clearly what I did.. but here are some real resources for you, from people with lots of experience and skill in this area:
I really recommend this YouTube tutorial for painting folk flowers with acrylic paint --this artist has such a lovely personality and is so encouraging, I subscribed to her channel and hope to practice with her soon - she uses acrylic paints and tries to make painting folk flowers “for everyone” and doesn’t consider herself an artist, or started as a very green artist who didn’t think she could paint. This is a great one to watch, it’s only 5 minutes but will give you confidence.
Here’s a YouTube tutorial for painting folk flowers with watercolor
This is a really clever YouTube tutorial (there’s no talking, just captions) that shows how to print out a design you like and transfer that design in graphite to the surface you want to paint on - you could also draw out your own design and transfer it using this technique - I don’t know how easily graphite will transfer to a small cabinet door but this was very fun to watch and would be great for other applications!
(Also, just please bear in mind what images you choose to trace or transfer — there is most likely no harm in taking a design from an artist your really love and trying to duplicate it yourself, for YOURSELF — but please do not share it (particularly on social media) without crediting the original artist for their design, and it’s never okay to sell something you make using another artist’s work. The lines of art and craft can sometimes seem blurry, but I know from experience that it feels terrible when someone does their best to make an exact copy of your work and then sells it as their own or takes credit for the idea. Be thoughtful about where you take inspiration and while we’re all influenced by art we love, we should try to give credit to what and who has directly helped or influenced us.)
And lastly, here is my folk art pinterest page I have that features quite a few folk art painting designs, some of them show step-by-step how to form a flower or leaf, like this one below


I hope you’re inspired to pull out a box and see what happens - let yourself dwell in possibility again as you did when you were a child, no pressure, no expectations…. it might take a few tries to get where you want to go - it did for me - but I enjoyed the process and learned some things and I’m excited to see what we can make together next.
Wishing you very happy making,
Rosanna


Pixie Pumpkins

These miniature spun cotton pumpkins are simple to make, require only a few inexpensive supplies, and come together quickly - making them a nice little project to do with kids and creative friends, or a sweet party favor for your next ladies’ get-together or luncheon.
I suppose luncheons are a little out of date but I still enjoy meeting with my sister and mom and some close friends every so often - we might not eat chicken casserole or anything involving a gelatin mold and usually we’re in garden clothes and I have a least a little hay in my hair but we do drink something hot and enjoy a bite of something together and my daughter Nettie loves to set the table for these special times - and I know she’d be thrilled to have a whole set of pixie pumpkins to use for our next girls lunch. So that’s my goal, to get another three or four of these pixie pumpkin place card holders made by the end of this month because that will give us a good excuse to get together. Sometimes you have to create an occasion, right? Otherwise we all just keep slogging and slogging and never stop to take an hour to enjoy one another…
Now I don’t expect all of you to be a fan of the hot pink pumpkins but obviously the making process for any color of pumpkin is exactly the same and you’re free to be as traditional or as wacky as you like with the paint and decoration.. in this blog post I’ll be demonstrating how I made these larger place card holders which are built around a small stone inside - but you can size down a bit and leave out the rock to make a simple, smaller pumpkin decoration. I show how to do this in my pixie pumpkin video on YouTube with Nettie - and the second part of that video shows video footage of making these place card holders so if it’s easier for you to watch and follow along, please do refer to that make-along.

this is our patch of “natural beauties” :)

the place cards pictured above are available as a digital download here


To make your pixie pumpkins, you’re going to need a few pretty basic supplies and then there are different options and variations for what can be used so be creative and use what you have!
You’ll need:
cotton balls or other cotton fiber such as cotton punis, cotton fill from pill or vitamin bottles, or loose fiber cotton batting (I recommend just starting with cotton balls if you’re new to spun cotton but if you’d like to invest in some nicer fiber, I use these punis from The Woolery and this fill fiber from Amazon
cotton quilt batting (optional but handy, it’s what I use for this post but I show how to make pumpkins using only cotton balls in the YouTube video)
aluminum foil - I save and reuse wrappers from chocolate bars but kitchen foil will work too
Elmer’s glue or any white school glue or PVA glue (tackier craft glues don’t work as well for the glue mix in my opinion because they will make the cotton so sticky and difficult to work with but they are handy for other parts of this project if you don’t have hot glue)
wire of some sort - for the place card holders the wire will be visible so something you like the look of - for the regular pumpkins the wire will be covered so you can use anything, including a twist tie or pipe cleaner or whatever you have
jute twine or string - if you don’t have wire and you’re making a regular pixie pumpkin that won’t be a place card holder, you can use jute twine or string for the pumpkin stem (I demonstrate this in the YT video)
a few rocks or stones if you’re making the weighted place card holders
scissors
paint of some kind - watercolor, gouache, or acrylic
paintbrushes
a toothpick
masking tape
hot glue (optional)
mod podge or other sealant (optional)
optional: mica flakes or mica dust or glitter if you like or metallic paints or any glittery, shimmery product you enjoy
Okay, let’s get started - and if all these photos and words(!) overwhelm you, I do invite you to watch the video first as many of us do learn better that way - and then you can come back here and reference this for anything you’ve forgotten or need to see again.
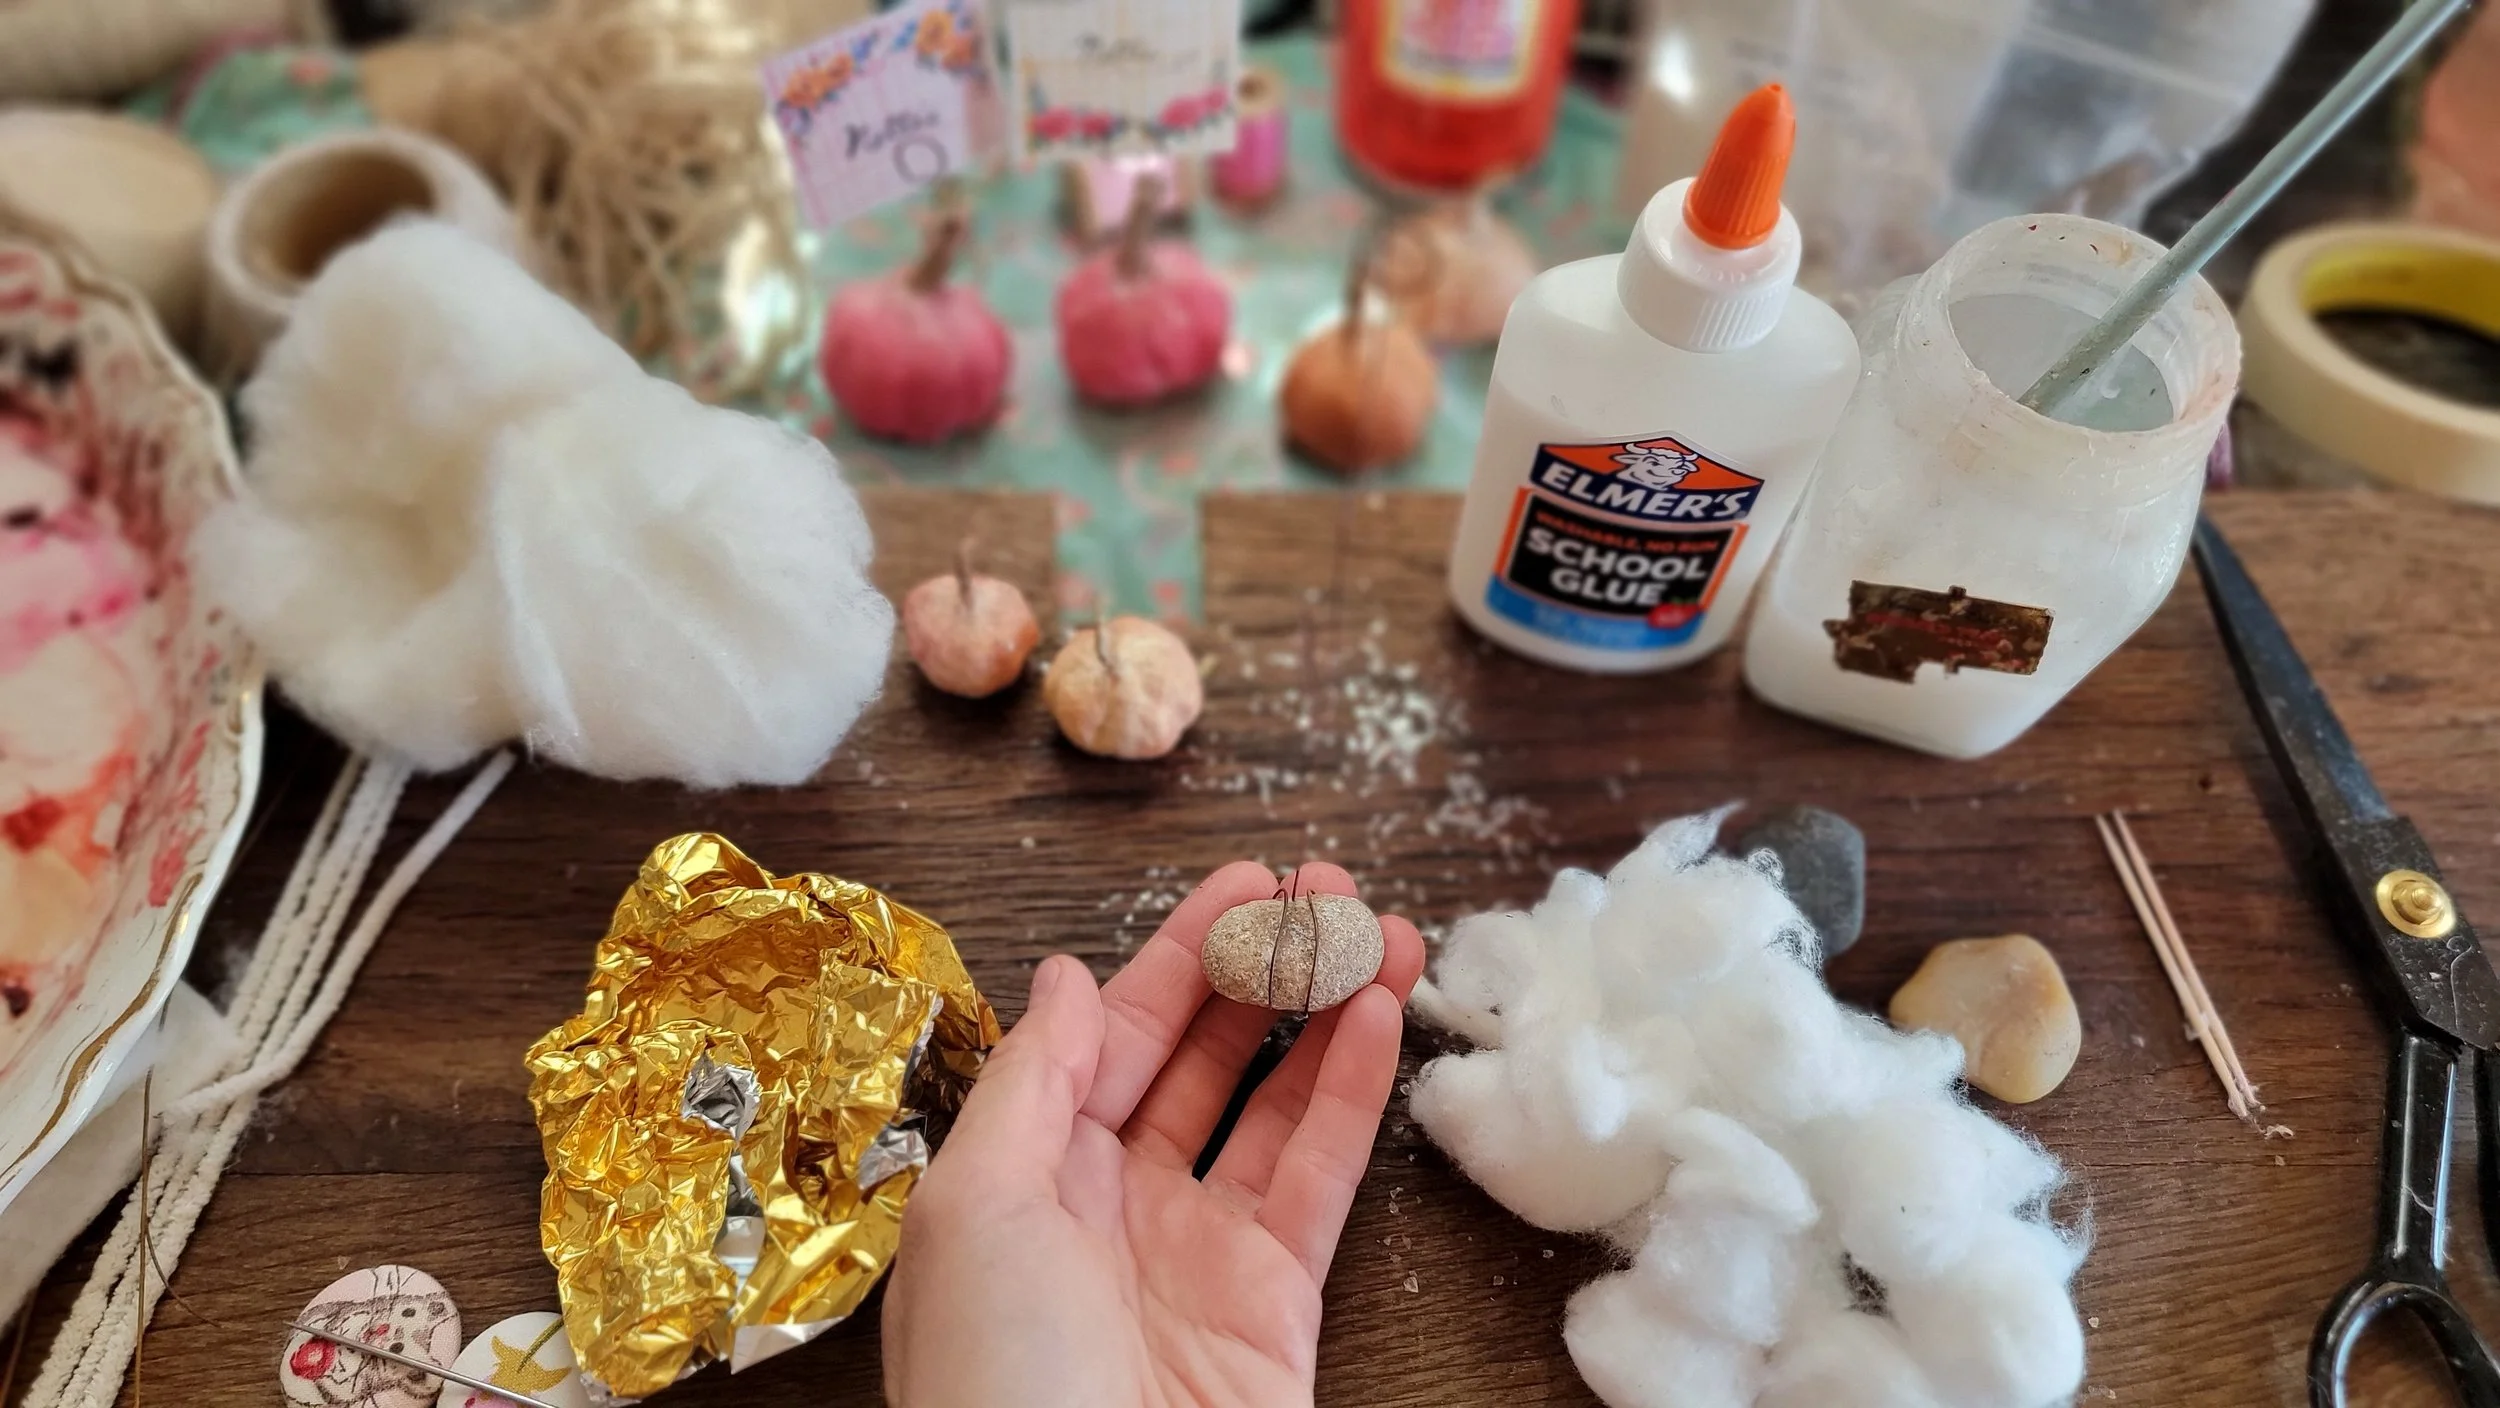
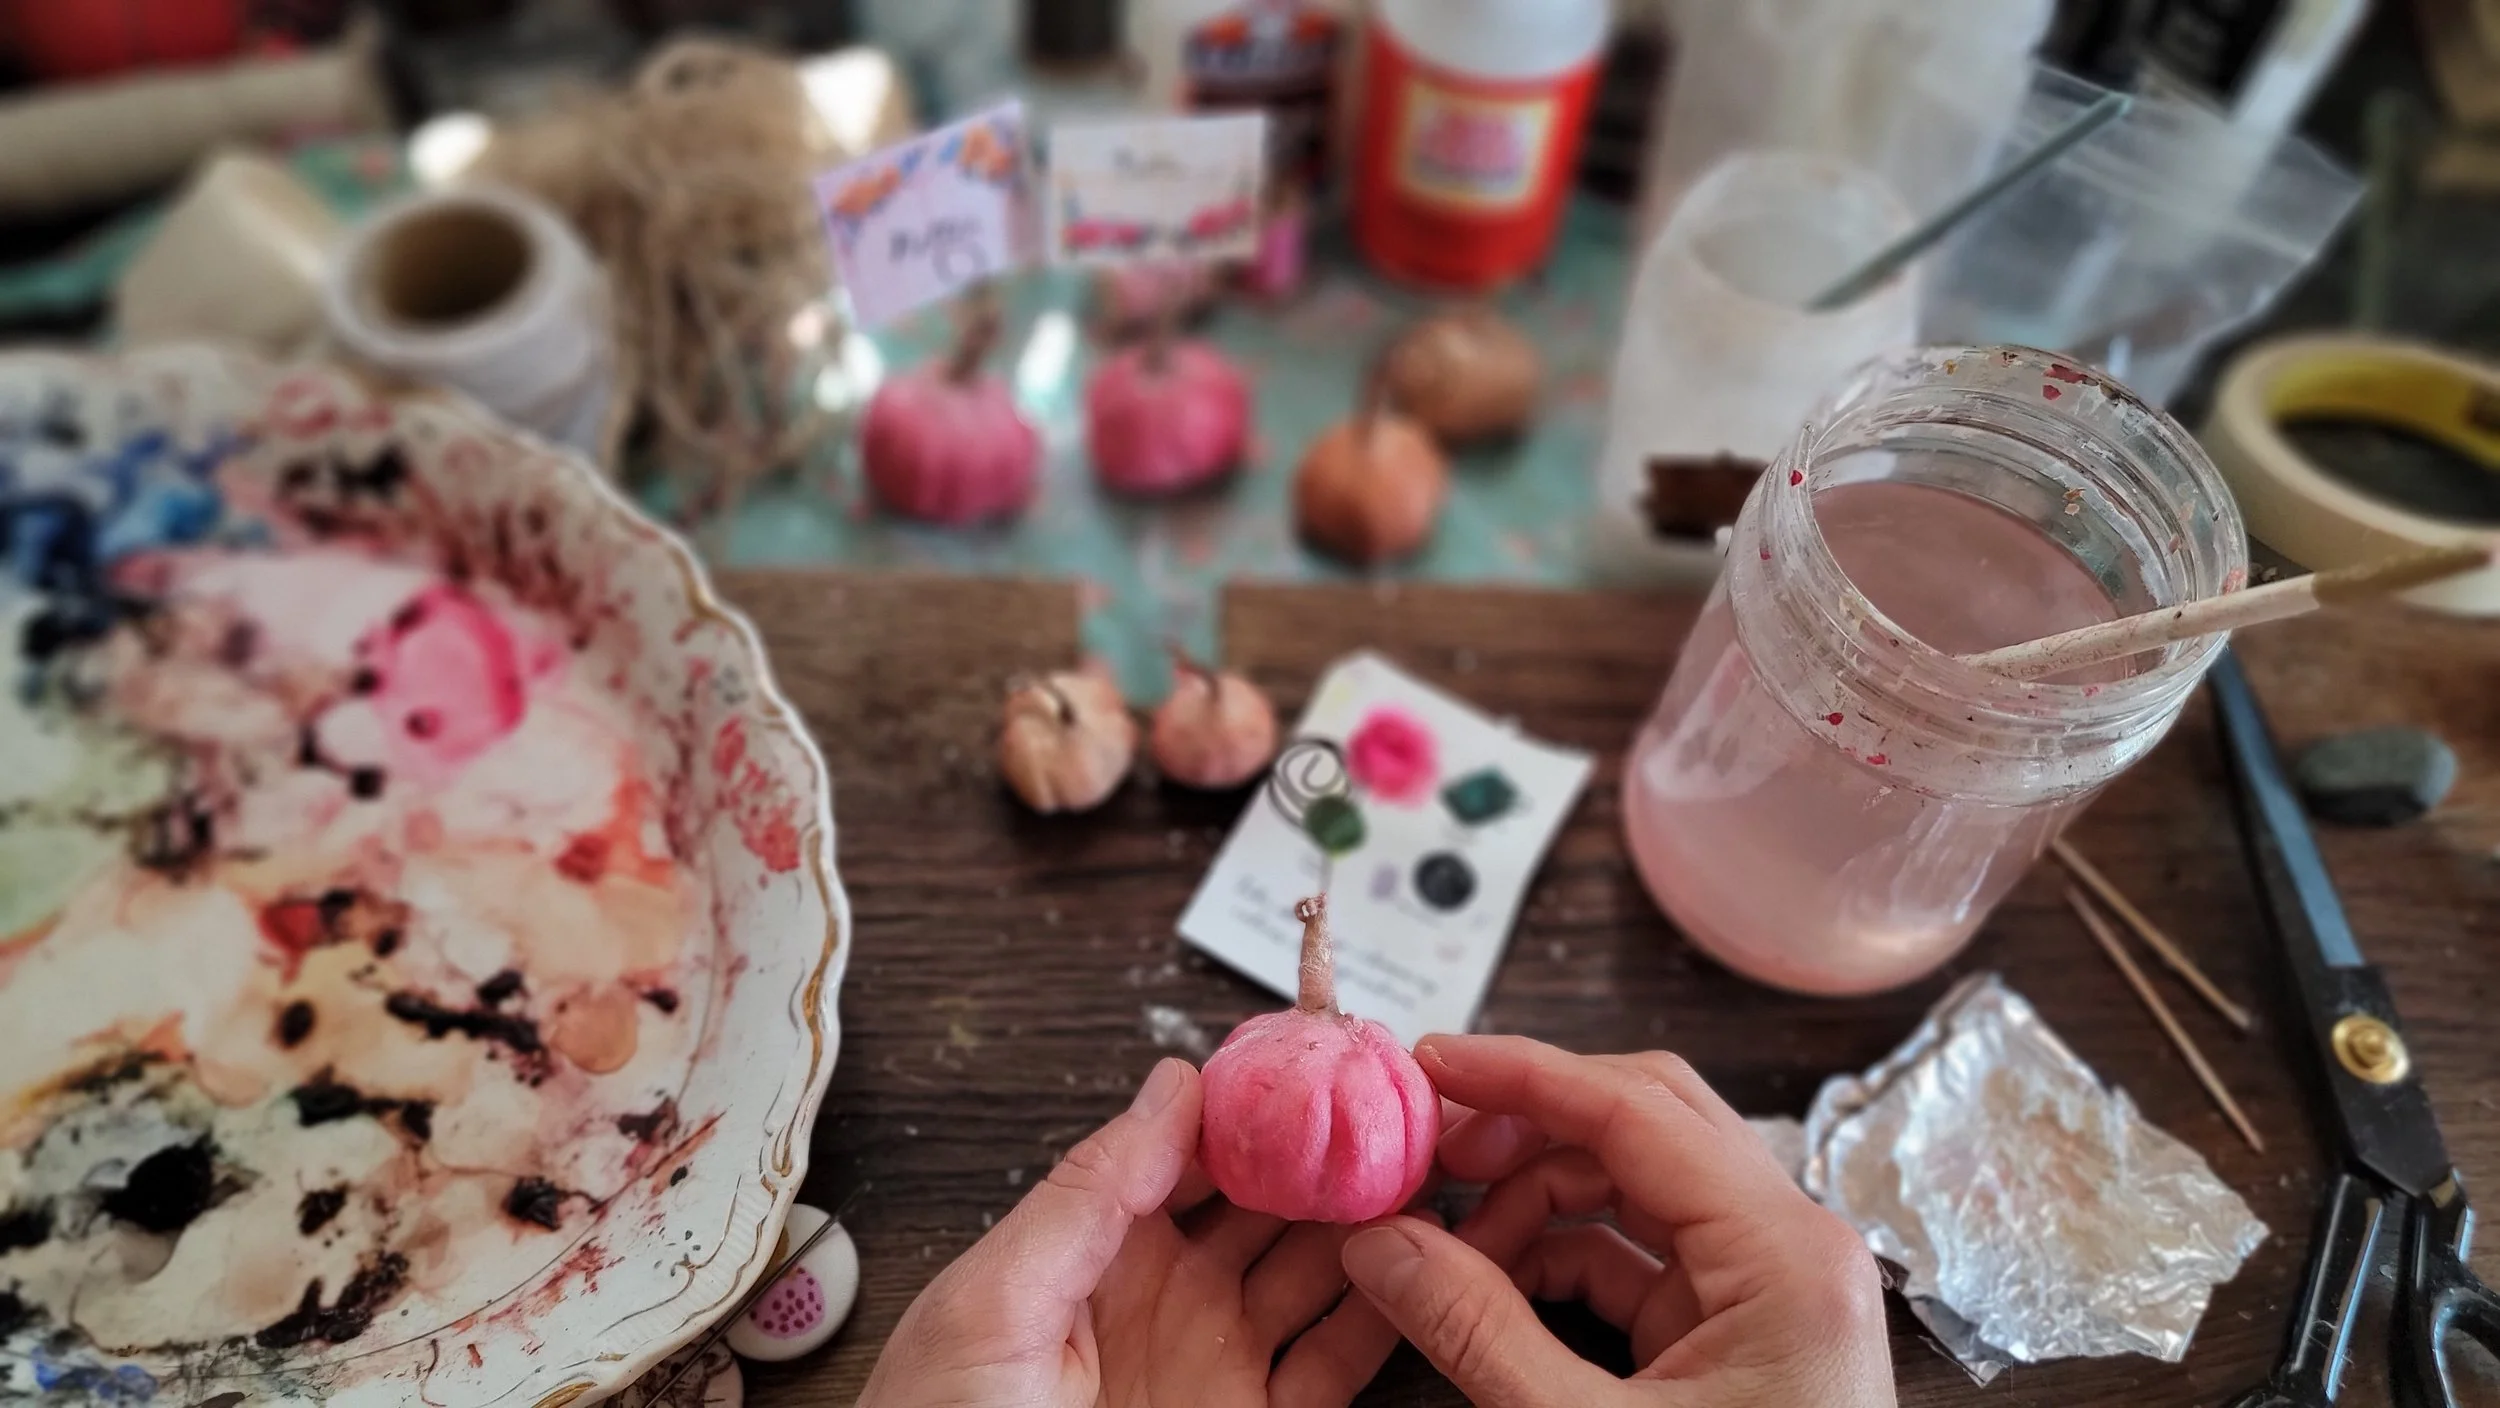
To start, cut a longish length of wire, about 12 to 16 inches to be safe, and then take your rock and wrap the wire around it at least twice. I don’t knot the wire but you can if you want to - I rely on the foil to hold it in place.
Then take your aluminum foil and crumple or wrap that around your stone until you get the size and shape you want - it might take a few layers depending on the size of your stone and how big you want your pumpkin to be. Keep in mind that that batting and cotton will add to its size - it will grow at least a quarter inch across if not more with the cotton.

go ahead and bend down what’s left of the wire, I like to make a spiral shape - so that it’s out of the way and not catching on things
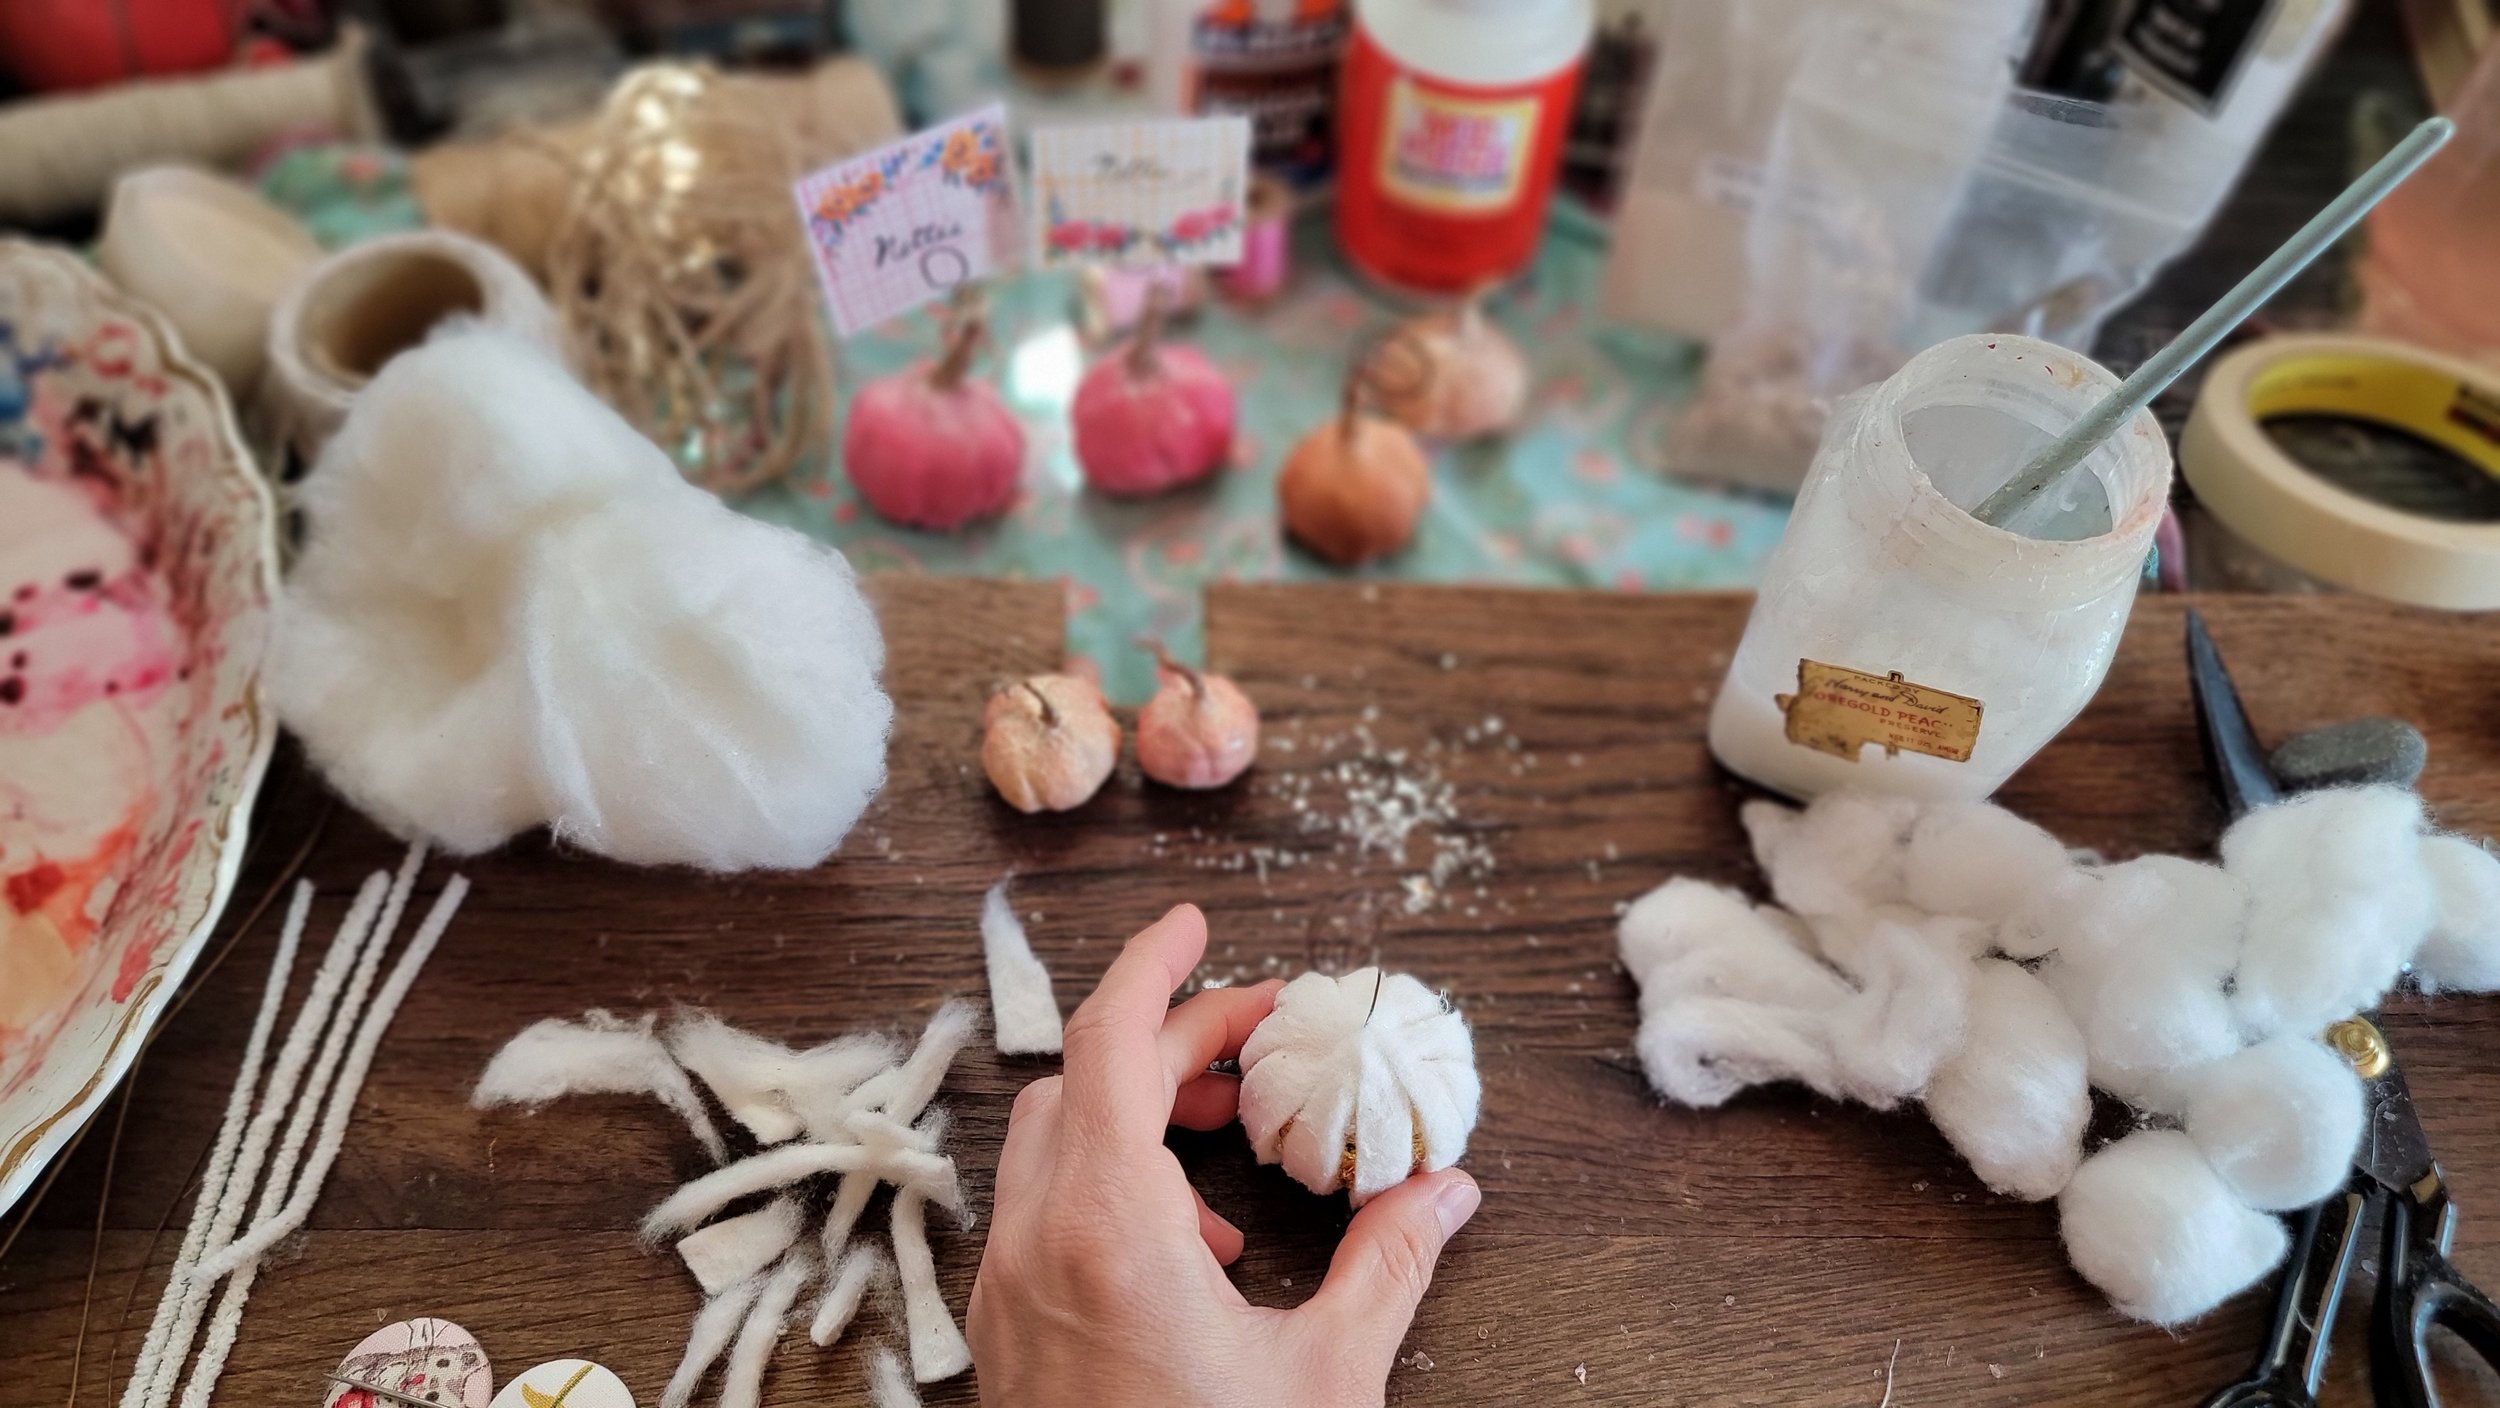
Then you take your quilt batting and cut a few strips, at least a quarter inch thick, or maybe closer to 3/8 inch. That’s what I did anyway - these will be the sections or “ribs” of the pumpkin, so it’s up to you how thick you want them. Then I pull those long strips into shorter pieces, you can see the size of them in the photo carousel below — you will need between ten and fifteen of these to cover your pumpkin base (number will of course depend on the size of your pumpkin and the width of your strips so I’m just giving what worked for my pumpkins).


If you have a glue gun and don’t mind working with it, this will save you a little time - put a bead of hot glue near the stem or wire at the top of your pumpkin and press the end of a strip into it, then make a bead of hot glue at the bottom of the pumpkin and attach the strip there. Make sure the strip is fairly tight and holding firm or it might wrinkle during the next step when you apply the cotton and glue wash over the top.
If you don’t have hot glue, this same process can be done with school glue or any craft glue - just make a line of glue all the way down the pumpkin for each strip - and then you will need to hold your pumpkin carefully as you work as the wet glue means the batting pieces can move or slide. I did experiment with it and it worked fine but you will have to be more delicate and patient. You might also want to let the glue set partially or fully before going on to cover it with cotton and glue wash.
IF YOU DON’T HAVE QUILT BATTING — please refer to the YouTube video - in the first portion with Nettie, we make pumpkins without batting and you can follow that technique to make a pumpkin using only cotton balls or other cotton fiber.


Attach strips of cotton batting with glue or hot glue until your pumpkin is fully covered. Make sure you leave a small crack between each piece so that your pumpkin will have indentations.
*** The reason I pull the batting apart into pieces rather than cutting is that it leaves a smaller, frayed end and these ends meet together more smoothly at the top and bottom of the pumpkin. If you cut your ends square, the ends will overlap at the top and bottom and will look clunky and make a knobby lump which will make it hard for your pumpkin to sit flat.
make sure your pumpkin is sitting fairly flat and level before you continue - if it’s not, trim some of the batting
Here’s where we need our glue mix - so if you haven’t worked with spun cotton before, the glue mix is typically just school glue and water. I use a mix of one part glue to four parts water, so about one tablespoon of glue to four tablespoons of water. There are other ways people do it and other glue wash ratios and things people use (such as potato starch) but this is what I’ve had success with.

I use an old cheap craft brush for applying my glue wash - you can find something suitable in a big pack at a discount or craft store or you can often find craft brushes at secondhand stores.
If you have cotton balls, unwind a few of them and then pull them into small, thin pieces. Take one of these thin pieces and lay it over the gap between two pieces of batting, then use your brush to smooth it down, covering the foil and also the batting. You will probably need to cover each section with a few pieces of cotton to fully cover the foil. If you have other cotton fiber, you do the same thing, just pulling off small, thin pieces of fiber to work with so that your layers are smooth and not lumpy.


Continue applying small, thin pieces of cotton until your pumpkin is completely covered. I completely cover the pumpkin with cotton fiber. The batting should take paint like the cotton fiber but it might not look exactly the same or might turn darker or lighter than the cotton fiber so to avoid patchiness, I cover all the batting.
*** Your pumpkin should be damp but not sodden or dripping. If your cotton is absolutely saturated with glue wash, you’re using much more than you would need to and this will make your drying time much longer - you might also find that your pumpkin flattens on the bottom if it’s too wet so when applying the glue wash, you’re going for damp but not wet.
Check again to see that your pumpkin sits flat.

Now you need to wrap your wire to form the stem. But if this step intimidates you or you find it too difficult, I think the plain wire looks fine as well. It’s slightly more modern looking or stylized, but it works in my opinion. I wrapped most of my pumpkin stems with cotton but there are other options.
It’s possible to wrap the wire with jute twine if you have it. Simply pull the jute apart into the three strands and take one of these strands. Attach the end at the base of the wire with hot glue and then wrap tightly until you reach what you want to be the top and secure with more hot glue. If it’s not thick enough you can repeat that process again.
Fabric scraps can also be use to wrap the wire and you can use hot glue or glue wash to secure the fabric. Batting would also work. Cotton kitchen twine can be used to make spirals to look like the ends of vine.
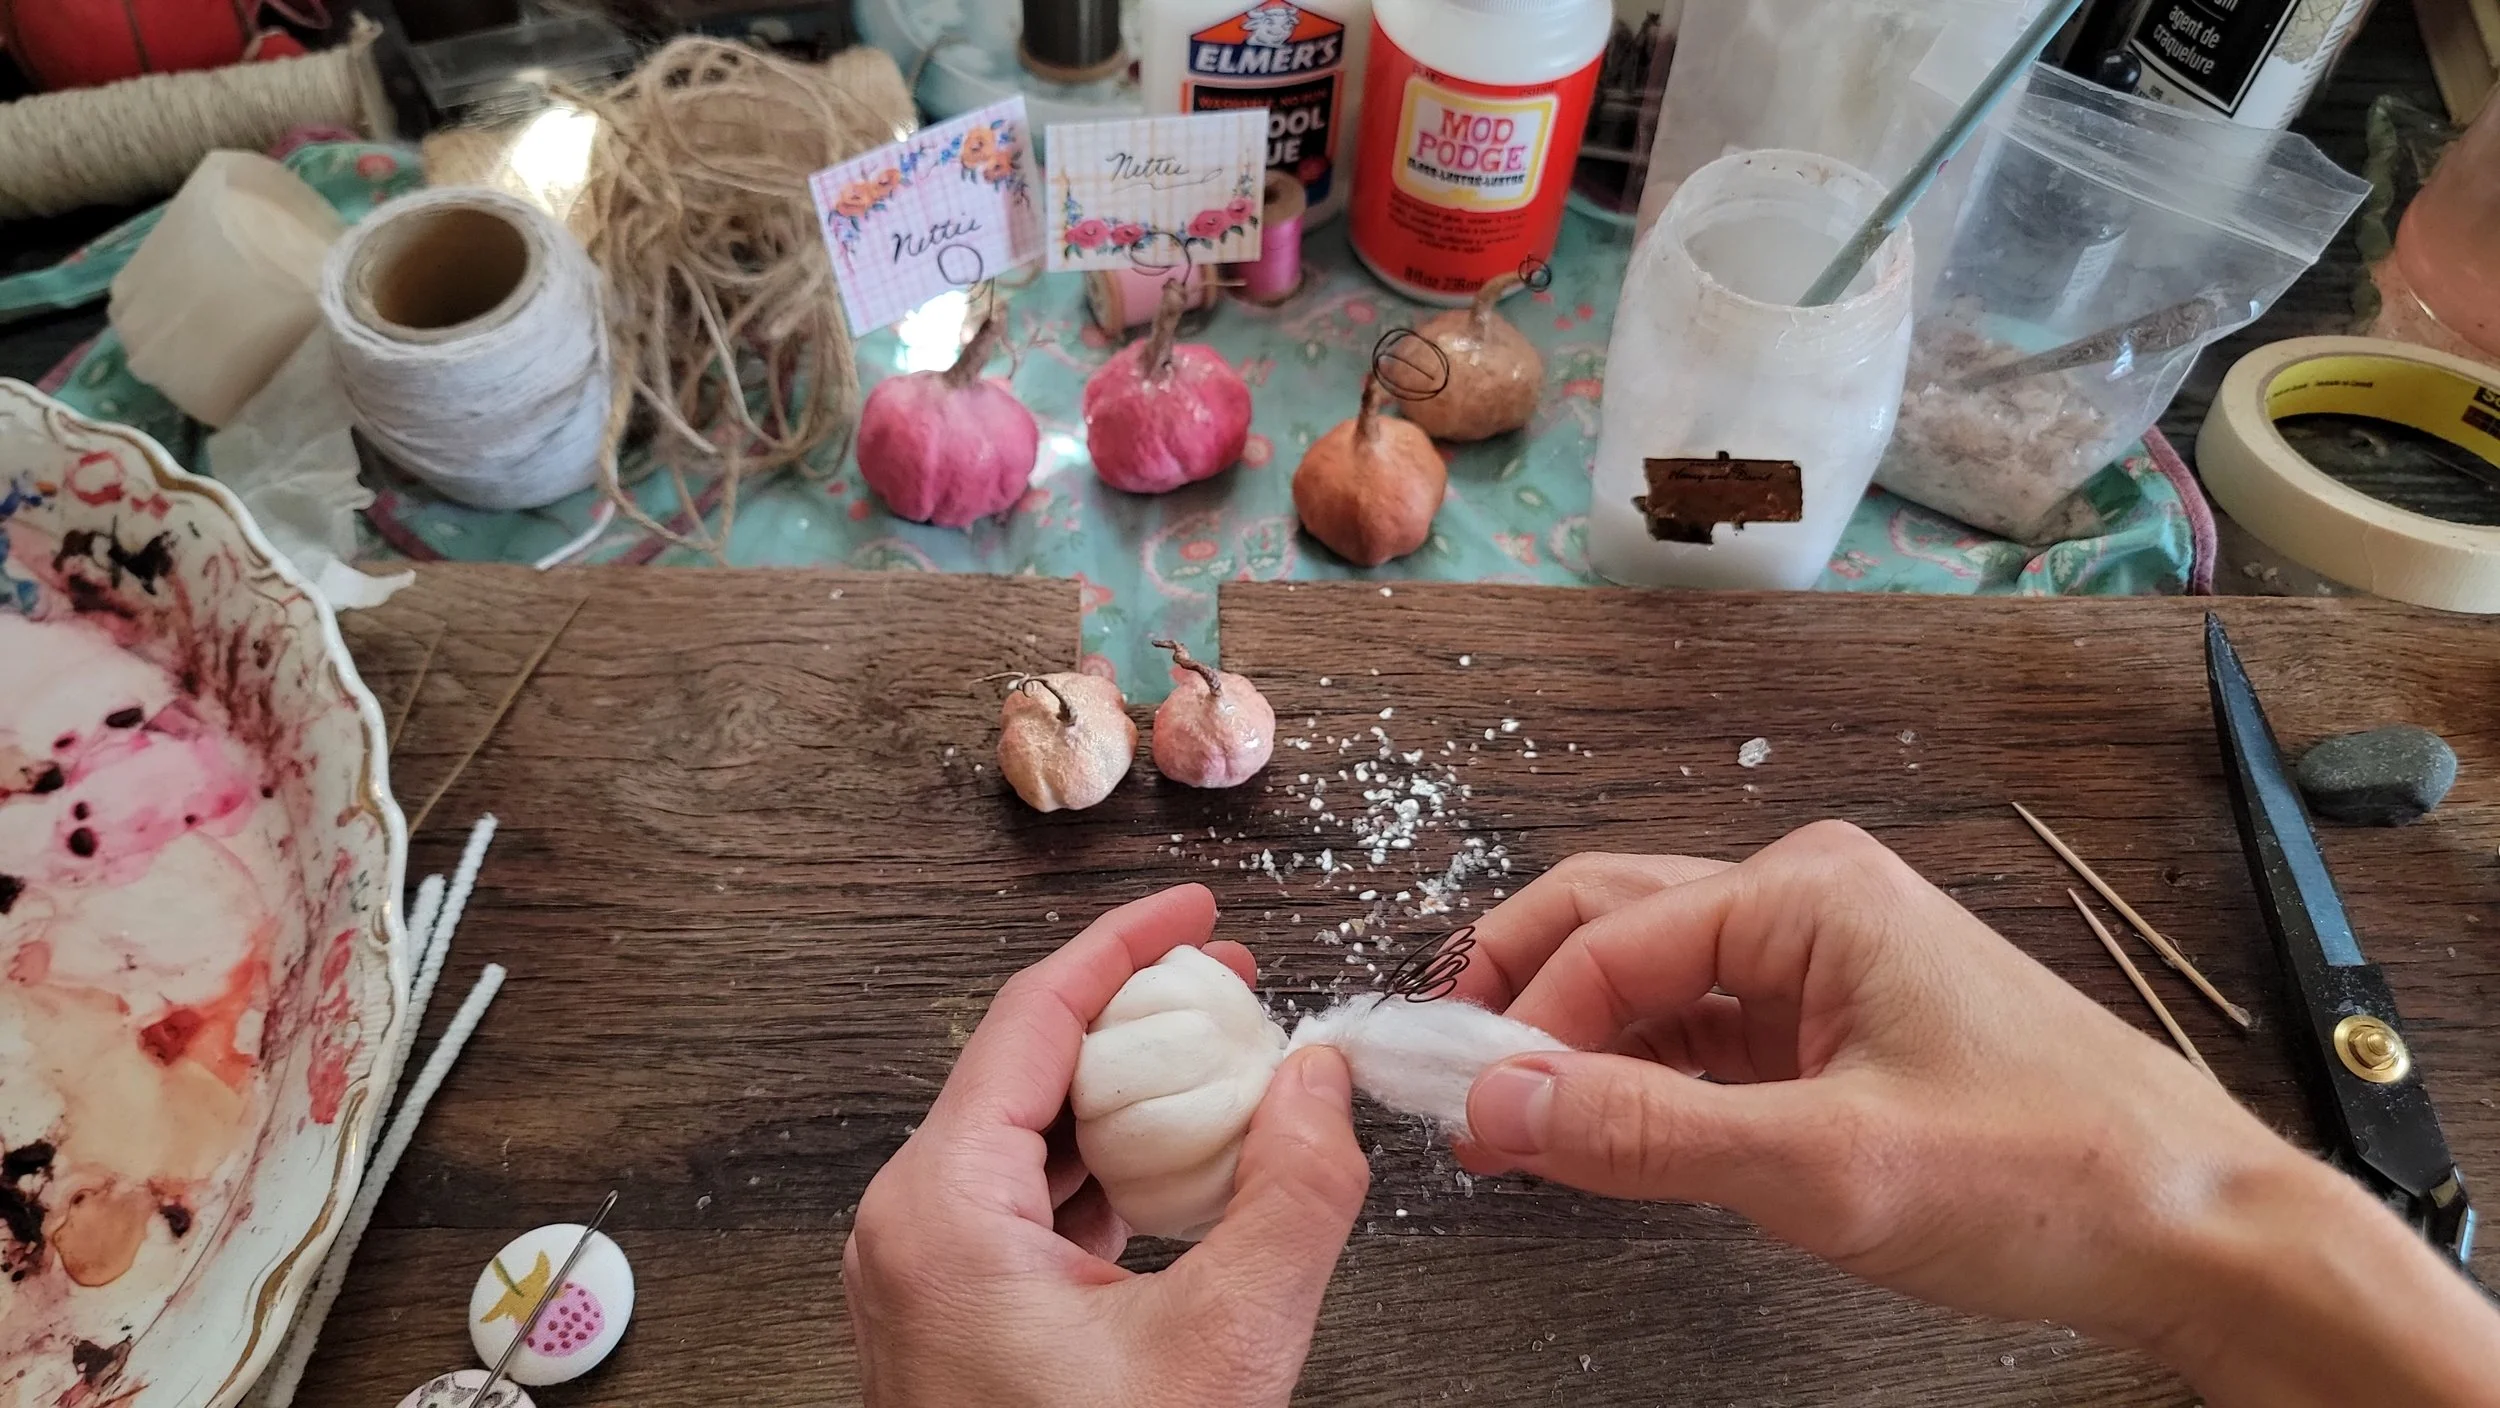

To wrap with cotton, just take a longish piece of cotton fiber and hold the end with your finger against the top of the pumpkin, then wrap tightly, using your brush to apply a little glue wash, moving up the piece of wire until you reach the top. I like to spin the very end into a spiral to look like a vine. Add more cotton if it’s not as thick as you want yet and a bit more glue wash if any of the fiber is still dry.
You’ll probably want to add just a few small pieces at the base of the stem to blend the stem and pumpkin body together. Take very very small pieces of cotton and wrap once around the stem base and smooth them out onto the top of the pumpkin. This gives a more natural look, rather than the stem looking slightly disconnected from the pumpkin.

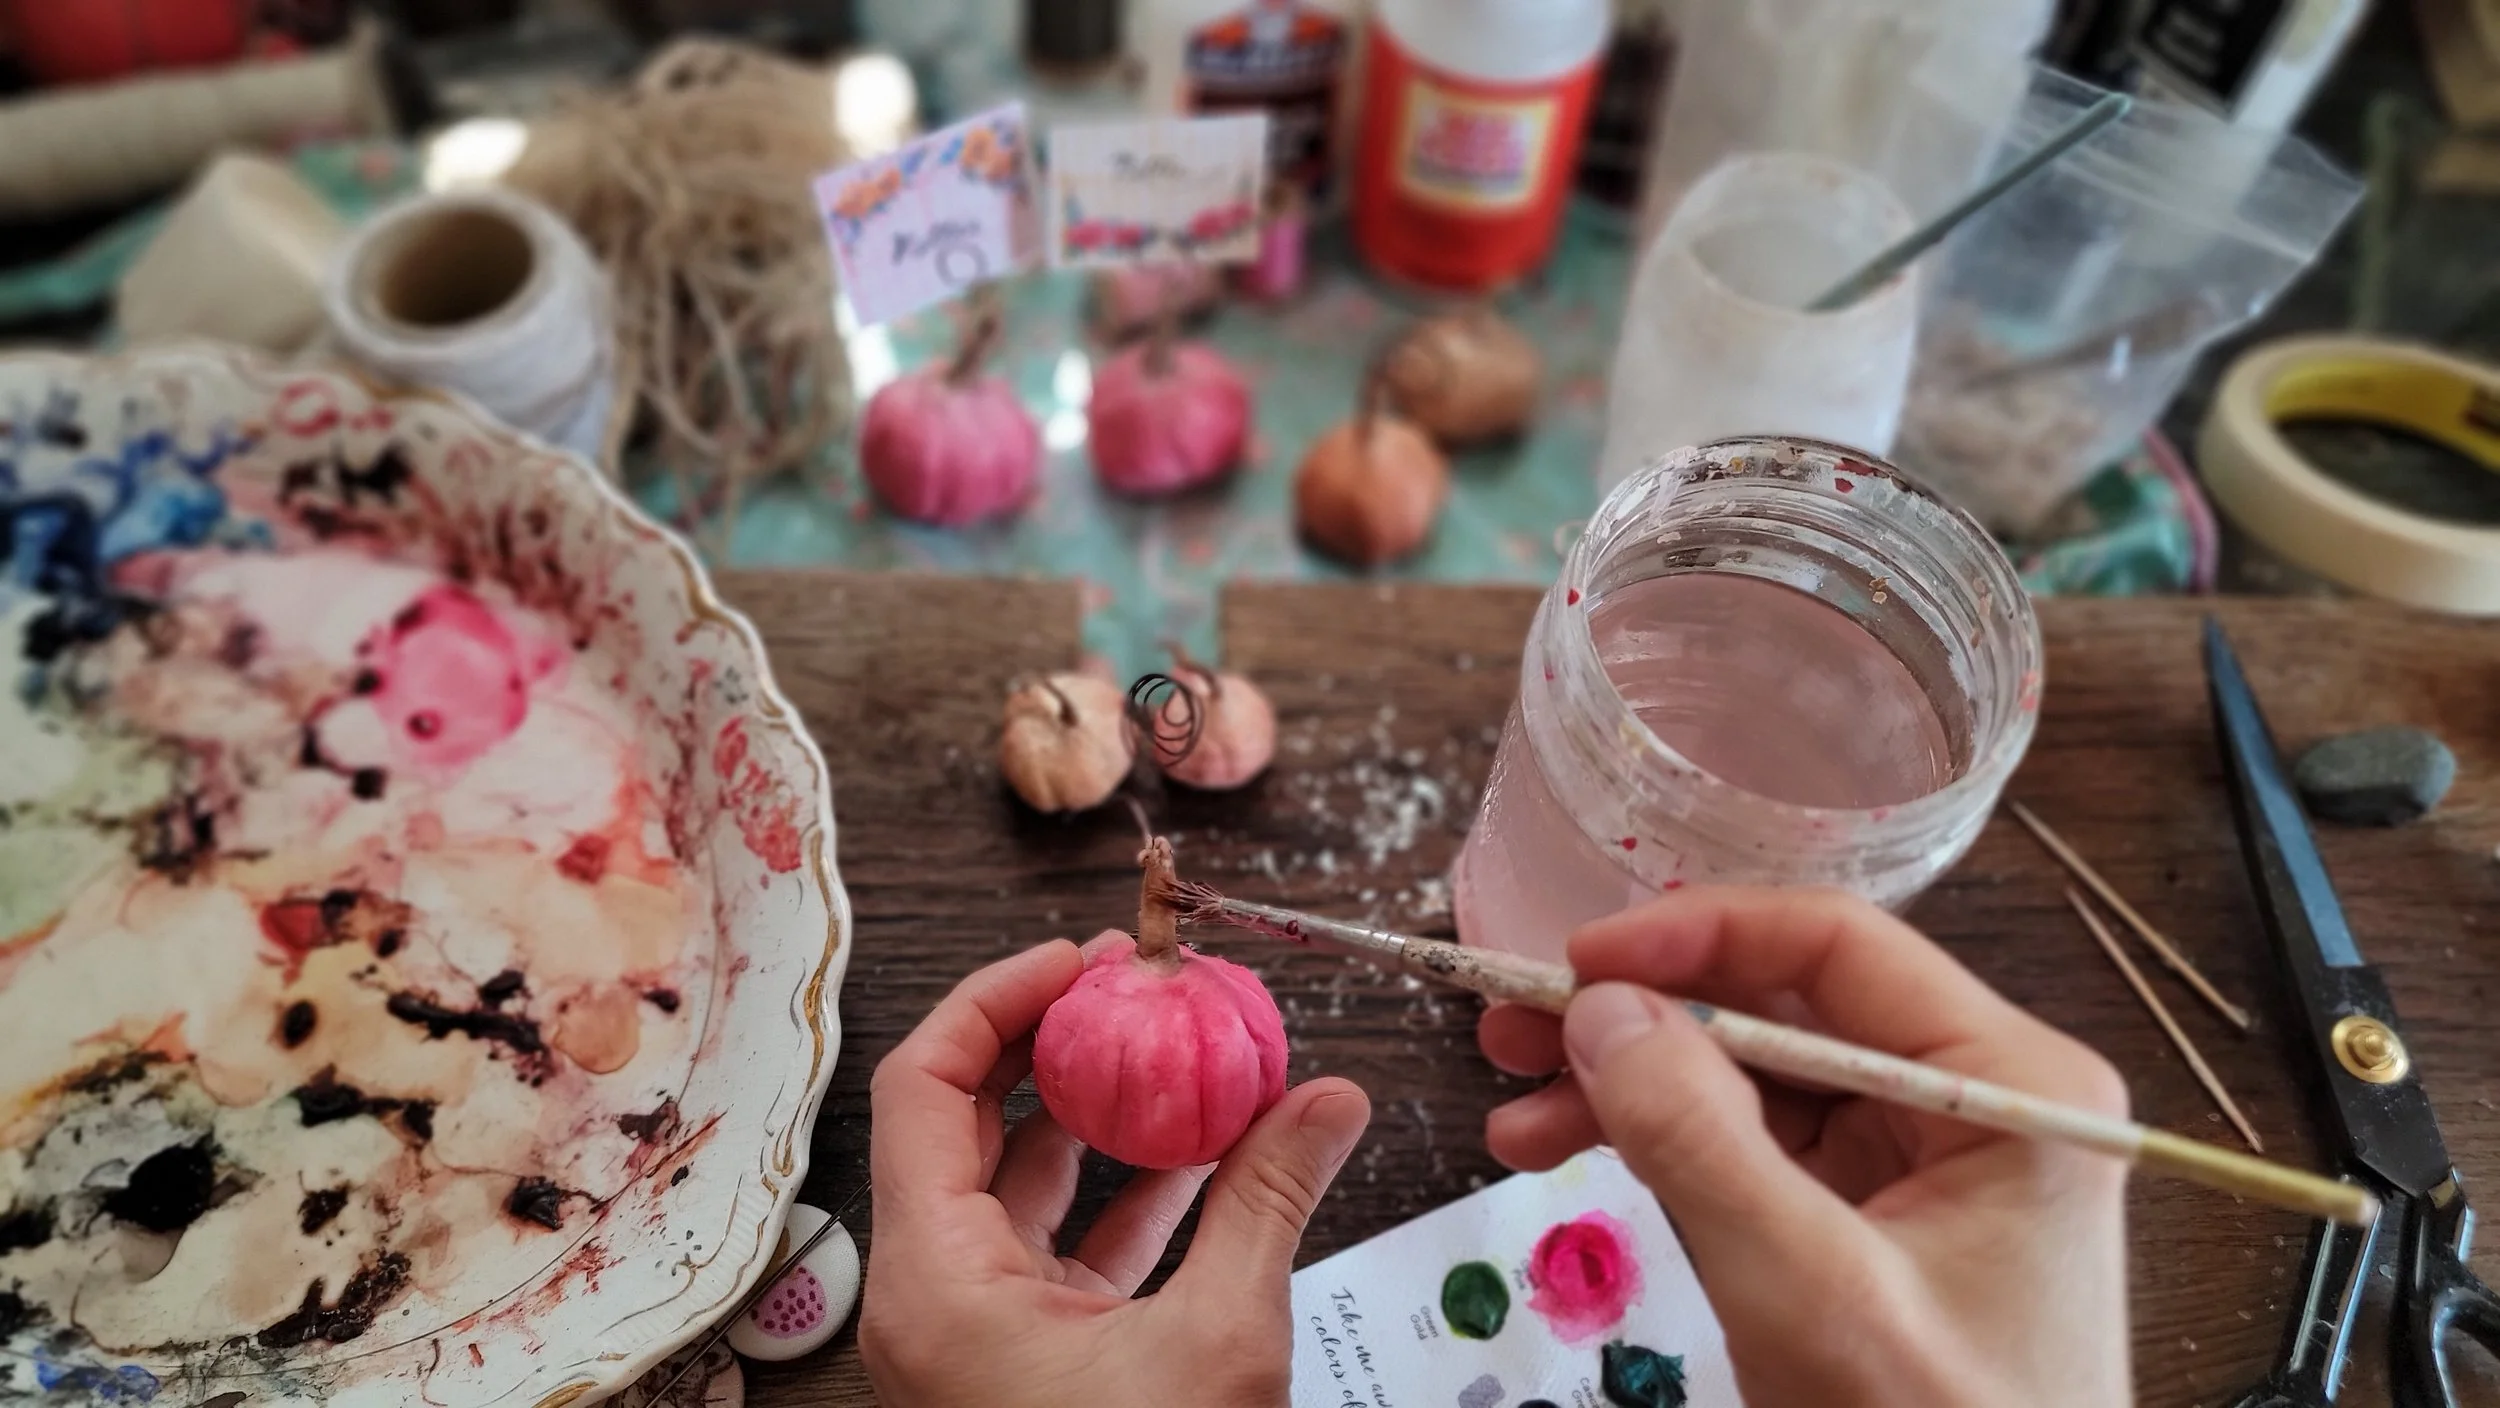
You’ve made it to the instant gratification portion of the make - painting :) Now I prefer to paint while the cotton is still wet but you may be a sticky mess and want to wait or maybe you prefer to paint dry.. If so, that’s fine and I’ll address drying in a moment - everything I’ve demonstrated for pixie pumpkins has used watercolors for painting - I chose watercolors for the smaller, more naturally-colored pumpkins I made in the YouTube video because I can mix colors and dilute them a lot and that gave me more realistic shades.. I have a lot of acrylic craft paint and I probably could have mixed colors and diluted with a lot of water to get more of the colors I wanted but it would have taken more paint and more time than the watercolor. I also like that I can mottle the colors and make yellow spots or add a little brown or green and darker patches if I want to, more easily than I could with acrylic.
I used a mix of opera rose and rose madder watercolors to make these pink place card holders but since the color is more monochromatic, I think a hot pink acrylic paint that’s diluted a little could give a similar effect. Gouache would work well too and you could use much the same way as watercolor. I think when I make more of these, I’ll try teal or aqua and a mustard color :)
Painting is, I think, pretty self-explanatory- the only thing I would say is that if you paint wet on wet with watercolor, you can experience bleeding - some of it you might like and some you may not. If that happens, you can take plain water and dilute out or bleed out the color from the spot you don’t want it, and then go back in with the color you do. If you can’t correct it this way, you can try to cover over with a little acrylic paint.
I’ve brushed on mica dust on top of wet paint and afterwards and it absorbs a bit more and is softer and more subtle when applied to wet cotton. It’s more metallic and shimmery applied when the paint and cotton has dried.
To dry your pumpkins, you can either let things dry naturally, or you can dry in a warm oven or toaster oven. Setting damp items near a heating vent or radiator will speed things up considerably. Even if you are air drying, you might want to set your pumpkin on a little piece of parchment paper to help prevent sticking. Air drying times vary a lot depending on season and humidity and how wet your cotton was to start … it might dry overnight, it might take 24 hours, it might take 2 days..
If you want to dry more quickly, I heat up my oven to 300 and then turn it off and set things in on a cool plate on a piece of parchment and let it sit for 20 to 30 minutes or more. That’s usually enough time to feel completely dry but you can leave in for an hour (with the oven OFF, be sure). You can also use a toaster oven - I would suggest at 250 or lower - 200 might be better and start with 10 minutes and check every 5 minutes after that.
Check your pumpkin after ten minutes in the oven and tip it up to see if the bottom is sticking. If it has and some fibers pull loose, simply dab them back down with your glue wash mix and your brush and then tip it on its side to continue drying. You can also make a little platform of toothpicks to set the pumpkin on so that less surface can stick to the plate.

mica dust can be added before or after drying, depending on what sort of effect you want
Once your pumpkin is dry, you can add mica dust or flakes or glitter or anything you like - you can also do a layer of mod podge or your favorite sealant.
For the mica dust and flakes, I just use a little glue wash on the pumpkin top and then brush on the dust or sprinkle on the flakes.
I wouldn’t use mod podge over mica flakes as you’ll lose the texture of the flakes.
I rarely use a sealant on things I keep for myself… but I do recommend Aleene’s spray finish and use that for things I sell.

Your little pixie pumpkin place card holder is ready to use :)
Hope you’ll have lots of fun making one or two or a dozen!
You can find these place cards as a digital download in my shop here.
I love to see what you make - please do share with me on Instagram @rosannadellart or you can email me : sweethavensanctuary@gmail.com
happy making to you!
xo,
Rosanna

Featured Posts


